The “2nd page SEO strategy” can be an AMAZING way to update old blog posts in an attempt to gain SEO rankings. And NO, it’s NOT just “adding more words.” That’s a useless strategy without important context!
For the past 48 hours, I have been holed up in a hotel room in Atlanta, GA.
By myself…
Studying blog SEO…
Kinda sad, isn’t it?
So while I’ve gotten a ton of work done here, there is one strategy I’ve learned that I REALLY needed to share with you.
There’s a ton of SEO content written about keyword research, backlinks, etc–but there’s not enough of this strategy.
Here’s what I did in less than 30 minutes yesterday:
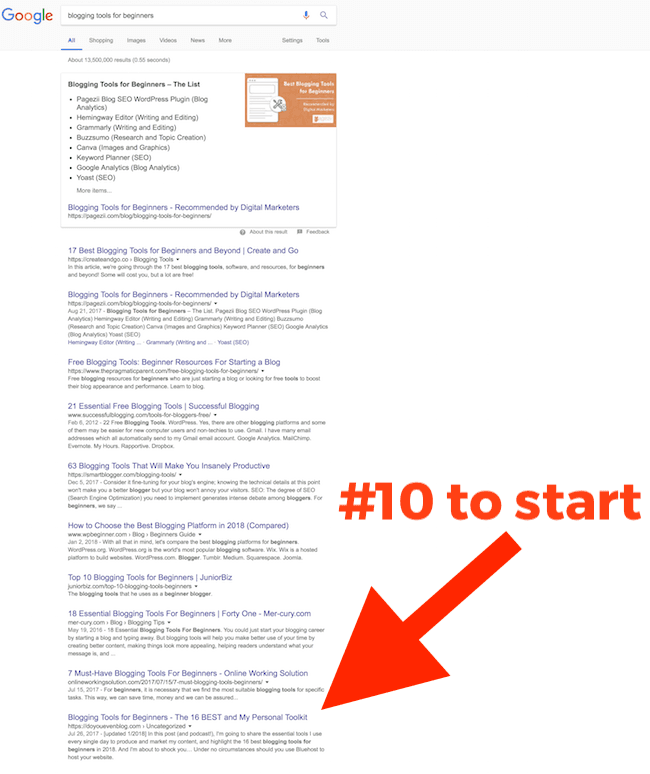
The above image is for a random post I wrote targeting the keywords “blogging tools for beginners,” showing it at the #10 spot.
After about 20 minutes of work, I sent a “Fetch as Google” request (we’ll look at what this is in a second), and promptly jumped up 3 spots.

Woot!
Update: It’s now rank #1 ?
How to revamp SEO on your old blog posts:
Please allow me to introduce what I call “The 2nd Page Strategy.”
The reason I call it this is simple: If an old blog post isn’t even on the 2nd (MAYBE the 3rd) page of Google, don’t bother with this strategy.
What we’re really trying to do is find something that’s doing well, and help it do really well.
Step 1 – Track your SERPs and actually recognize how you’re ranking 🙂
So, I use Ahrefs, which is pricey, but you can also useSERPWatcher (comes with the KWFinder suite), which is pretty dang awesome at $30/mo (waayyy cheaper than Moz, Ahrefs, SEMrush, etc).

However, you can totally track your SERPs for free!
Yes, this will feel very “manual,” but hey, it’s free.
Here’s the free Google template used in this example.
- Whenever you publish a piece of content, write down the name and the keywords you’re targeting.
- Leave it alone for a few weeks.
- Periodically check back in, do a quick Google search for the keywords, and check to see where you’re at….
- If you’re NOT on the first 3-4 pages….don’t go searching further. Just put down “N/A” in the rank column 🙂
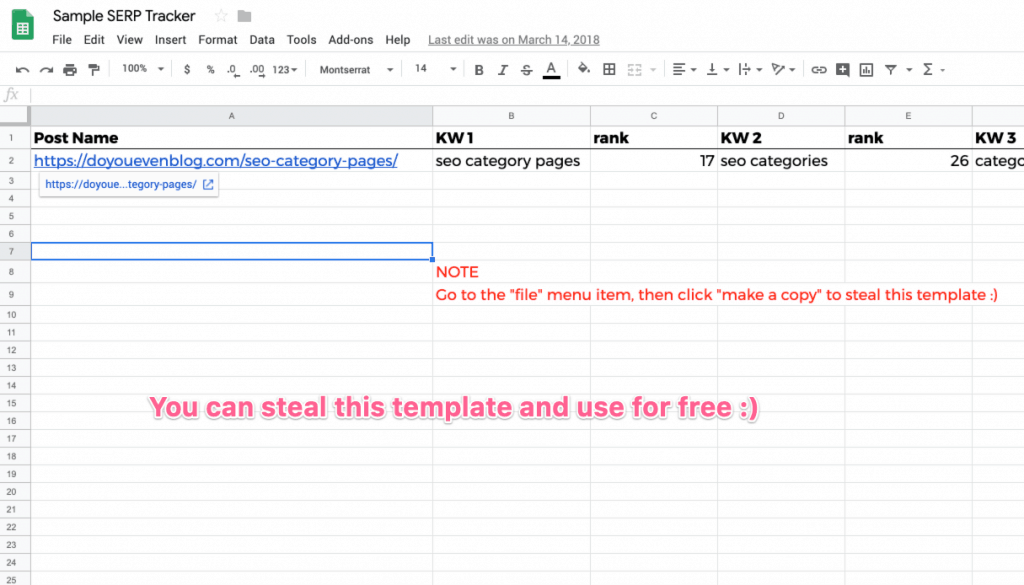
That’s it.
Remember, the goal is to find the posts that are doing well…and go back and turn them into really well!
Step 2 – Analyze the SERP (Search Engine Results Page)
What’s that you say?
You’ve got a post ranking in the top 30ish for your targeted keyword?
Congrats! Now let’s get to top 5ish ?
- Google your keyword.
- Open the top 10 or 20 results in new tabs (depends on how thorough you want to be!)
- BROWSE (not read all the way) through the results, one by one, taking notes.
Before we talk about what notes to jot down specifically, it’s incredible important to understand the following.
Google in 2019 is all about user intent.
More than ever before, Google understands the actual user intent behind users’ search queries. “What is this user REALLY looking for with this particular search query?”
When you browse the search results for your keywords, you are trying to find a pattern of user intent topics.
- Browse through the top 5-10 posts that are ranking already.
- Note the different topics and sub-topics they talk about.
For example, if we were targeting “blog traffic strategies,” we might look at page 1 of Google and determine that…
- 9 out of 10 posts include topics relating to guest posting
- 3 include mentions of Quora
- 8 include topics relating to improving SEO
- 0 mention listening to the DYEB podcast 7 days a week. ??
What you’re after is a pattern. More specifically, a part of the pattern YOUR blog post might not have…or could use more of.
Re-read that ?
If all the top 10 search results spent a HUGE amount of time writing about guest posting in the example above, and mine only has 1 sentence….what do you think Google thinks?
That my content is not comprehensive?
Step 3 – Adapt your content to the pattern, making it more comprehensive.
You’re already on page 2-3, so the GREAT news is you won’t have to do hours and hours of work!
In fact, if you’ve spent 10-20 minutes analyzing those other blog posts, chances are you’ll be in a great spot to update your own blog post in a matter of minutes.
It shouldn’t take an extra 1,000 words (unless you just want to?)
Add in any missing components of “the pattern” you hopefully discovered in part 2.

Remember the SEO goal here: Satisfy the USER INTENT for your keywords.
That’s what that pattern represents, at least in Google’s eyes, right this second. Thosetopics found in the top 20 search results.
Here’s what to add to your old blog posts:
If you’re lazy…or otherwise didn’t find the first few steps very fruitful, there are a few other things you can do to update old blog posts.
1 – Update outdated information.
Some examples, times, dates, etc, may have been relevant when you first published the post, but aren’t now. Update them.
2 – Add more media!
For real totally. Add more revenant pictures and/or video embeds! Google loves these.
Whenever I see Neil Patel’s high-ranking content, I’m always blown away with the amount of images he has in his posts.
3 – Make the intro quick and readable.
It’s always a good thing to
- Keep people scrolling down the page
- Get people engaged with the MEAT of the content quicker.
While these may seem like they’re at odds with one another, they aren’t.
Keep your intros nice and snappy.
With one liners like this.
Or…
- bullet points
- short catchy images
- etc
All designed with one purpose…
To get em scrolling.
4 – Add more, ya know, words.
As long as whatever you write is in line with user intent? And is relevant?
Go nuts.
Add an extra 250 words. An extra 2,500.
That whole relevant thing is the tricky part though. You can’t just add more random words about the PB&J sandwich you’re currently obsessed with.
(Unless you run a PB&J blog, in which case shoot me your URL!)
No, you’re gotta keep it on-topic.
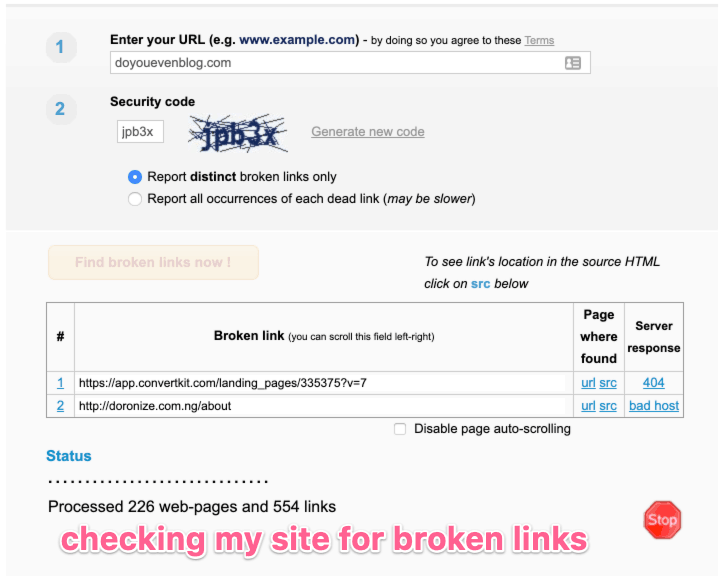
5 – Check for broken links (and remove them)
Head to https://www.brokenlinkcheck.com/ , which is my preferred free method for scanning your blog for broken links!
If the software spits anything back at you–just head into that content and fix/remove the broken links!
Psst – If you just want to check your old blog post for broken links specifically–you can use the free Chrome extension Check My Links ?
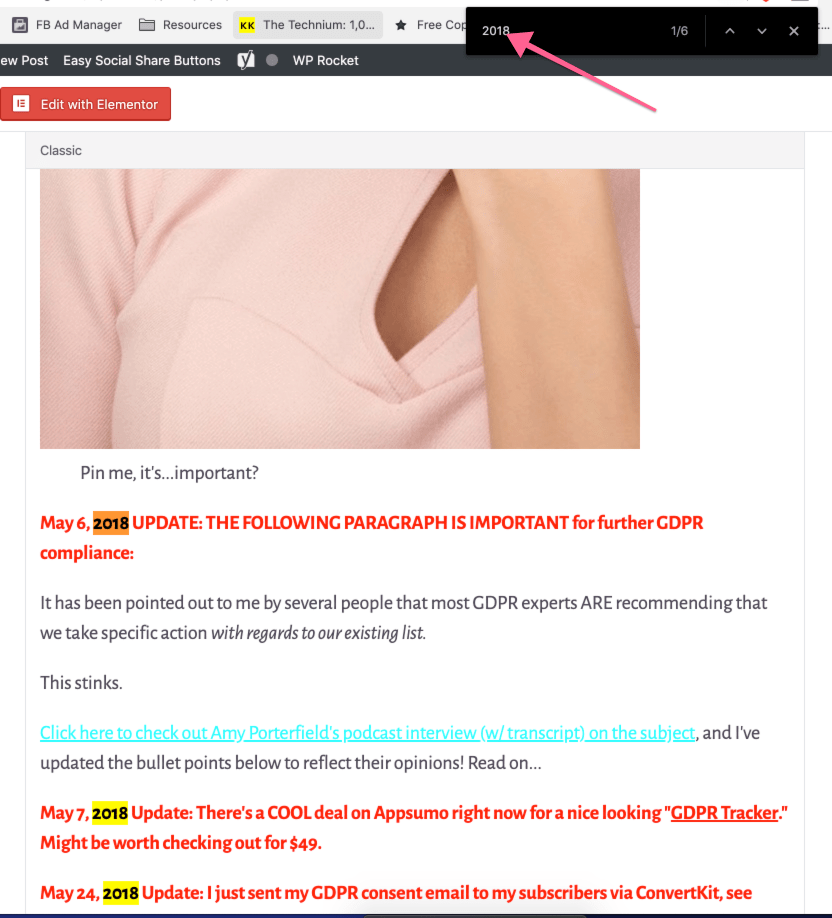
Use “Cmd/cntrl-F” to search your content for old dates, etc.
- Mac = Command-F
- PC = Control-F
This brings up the “find” function, and you can use it to search for outdated information–such as “2018” if you want to update the year, etc.
My challenge to you…
Do this this weekend, but set a timer.
Give yourself 30 minutes MAX.
(To be fair, let’s say 30 minutes AFTER you’ve found a post you’re ranking for in the top 30-40).
Also–if you enjoyed this post, you might wanna check how this one: SEO Category Pages – What are they and how to update them!