I have been blogging for a decade, and Elementor Pro is easily my favorite WordPress plugin.
And while it’s flexible, affordable, and powerful…
…it does has steep learning curve! ????♂️
Here’s a start-to-finish Elementor tutorial–so you can start turning “what’s in your head” into “what appears on the page.”
Let’s go.
What is Elementor?
Elementor is a WordPress plugin that helps you build and design different parts of your site.
Yes, it is a page builder, but you can also use Elementor to style custom-format blog posts, style your own headers and footers, as well create various “widgets” you can use just about anywhere on your site!
Did you know that I typed out THIS post in the normal blog post editor–but I have both the header, footer, AND blog post template styled with Elementor?
That’s right. Elementor has a “theme builder,” which really just means you can build pages or sections–and set up display conditions for them to display across your entire site ????
What are some examples of stuff I can build with Elementor?
- sales or landing pages (build custom from scratch or based on their templates)
- opt-in forms to place within your content–or sidebars, footers, headers, or anywhere!
- widgets within your content(!)
- custom headers or footers
- pop-ups
- “global” widgets–meaning you can put this widget in multiple locations across your site, and update all of them at the same time
- way more.
Is Elementor a plugin?
Yes, Elementor is a freemium WordPress plugin, meaning they have both a free version, and a paid version with extra features.
What makes it so special?
Elementor takes home my “best WordPress plugin currently made” for a few reasons:
- The page-builder easily rivals that of Leadpages, Instapage, and any other expensive landing page software.
- Elementor can replace many other plugins, such as any tool you use for either popups or opt-in boxes!
- They integrate well with email service providers (Mailchimp, ConvertKit, Drip, etc)
- Their team is constantly pushing out new features that blow my mind–especially for the price.
FAQ: How much does Elementor Pro cost? – Do I need the paid version?
You can get roughly 75% of Elementor’s features, today, for free.
However, the best thing about Elementor Pro is it’s incredible price: $49/year for your blog.
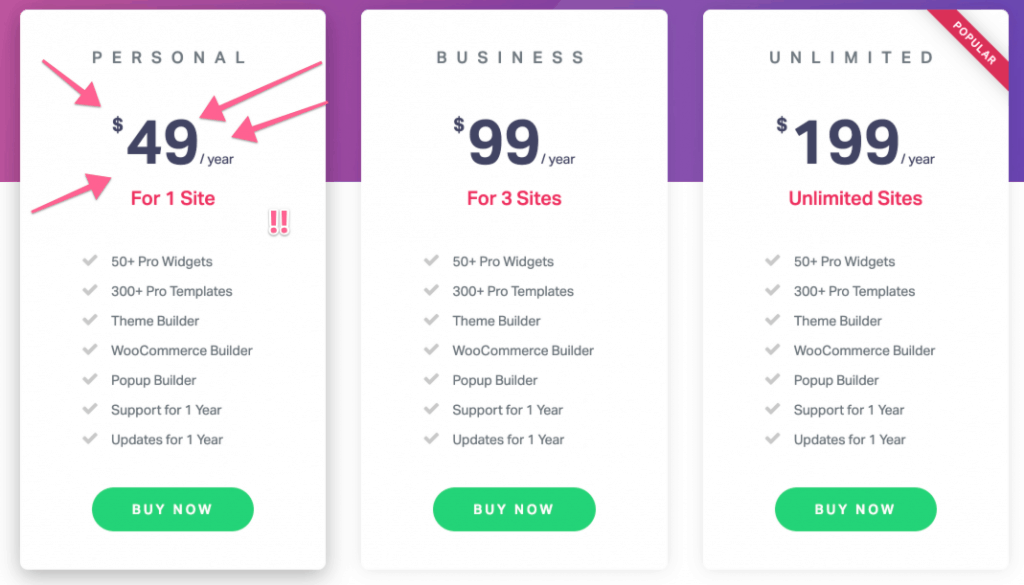
- Leadpages = $37/month for limited features
- Instapage = $129/month
- Elementor Pro = $49/year for all features
For the features we’re going to learn in a second, that’s a steal!
However, you can start using Elementor for free!
My review of Elementor: Who needs this?
Let’s cut to the chase.
If you’re serious about growing a blog, I think you should be using Elementor.
If you browsed my resources page, you’d realize I’ve never said that about another plugin before.
Why?
It simply “does too much” for the price. It’s the handiest plugin I use.
- building sales pages
- throwing together a quick opt-in page for your freebie
- making opt-ins you can place ANYWHERE.
And what if I had to switch from Mailchimp to ConvertKit or Drip or ActiveCampaign–or vice-versa?
No need to start from scratch–just change the integration.
FAQ: Does Elementor work with any theme?
Yes! Elementor is designed to work with any properly-constructed WordPress theme–meaning if a theme is built to WordPress standards, it is well-suited.
But what if you wanted to use Elementor to build your own, custom theme?
We’ll cover Elementor’s own “Hello” theme below ????
Ok, so I’ve convinced you to give the world’s best page-builder a try.
Now teach me to use it, please Pete!
A Start-to-Finish Elementor Tutorial for Bloggers.
We’re going to work from complete beginner to advanced Elementee (get it??).
- How to install the Plugin
- How to toggle between the editors
- A tour of the vitals
Then we’ll tackle advanced use-cases and more.
How do I install and use Elementor? And toggle the editor?
Elementor can be installed just like any other WordPress plugin, but you should note that Elementor Pro is a separate plugin.
It is downloaded straight from the Elementor website when you purchase it, and both the free and paid plugins need to be activated in your WP dashboard.
Important: There is only 1 “editor” for Elementor. You use the exact same software to build landing pages, global widgets, headers, footers–everything.
However…
You can access the editor in different places!

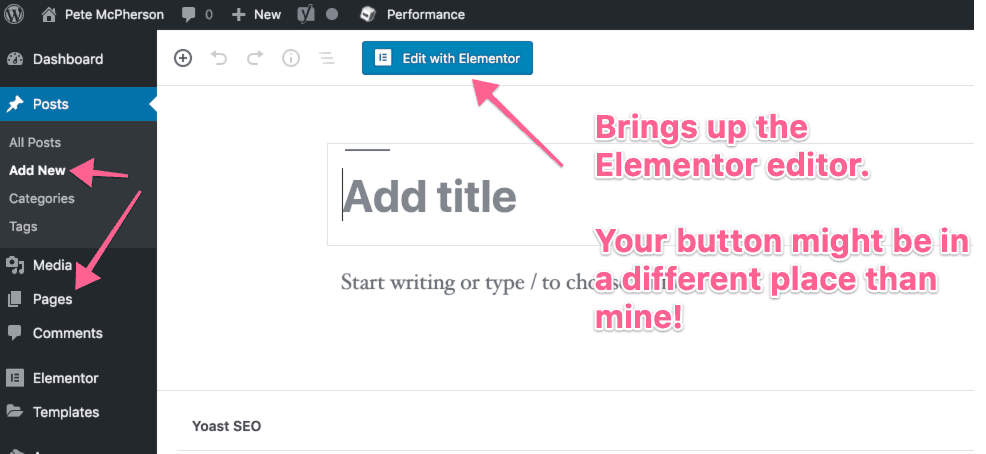
This can get confusing when you’re only editing a single widget.
It’ll bring up the same editor as if you were creating an entire sales page!
An overview and tour of the Elementor editor
Sadly, with more power and customization comes more settings.
It’s vital you understand where to find stuff.
Note: We’ll explore how to EDIT the individual settings after this.
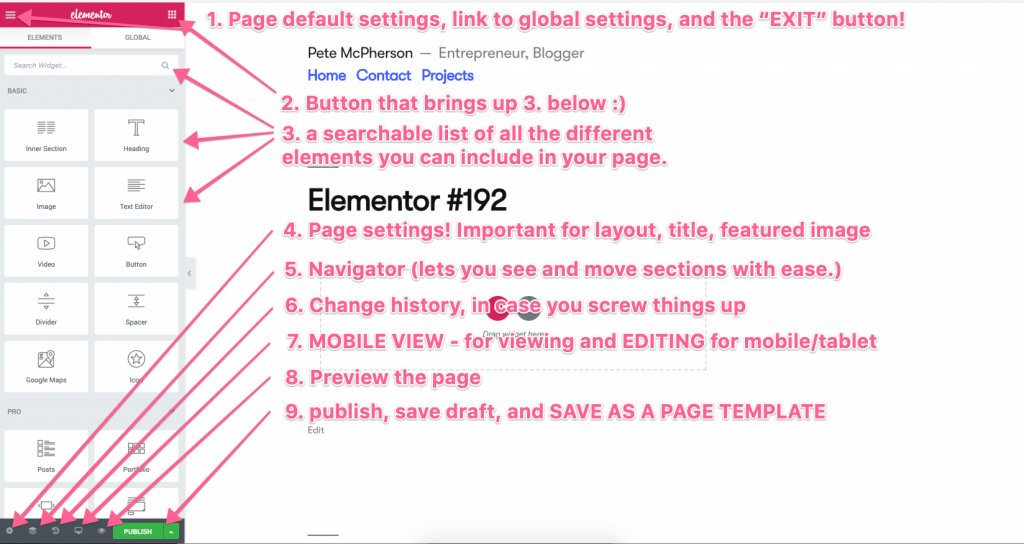
Let’s hit just the really important stuff here:
1 – Page defaults and global settings
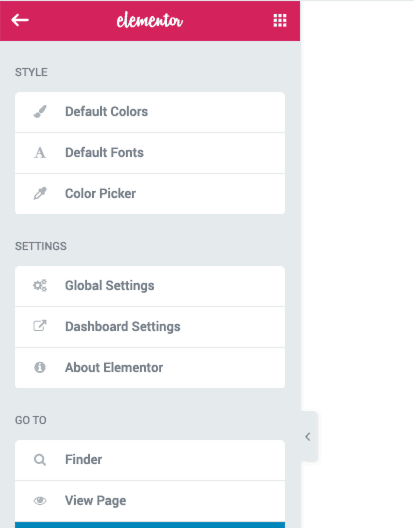
This is where you can set some default colors and fonts for this page only, as well as exit back to the WordPress dashboard!
Also, clicking “dashboard settings” will take you to the global Elementor settings in the WordPress dashboard.
Pro Tip: If you’d like to customize the “quick-selection color choices” that arise whenever you style new page elements, you can do that under “color picker.”
2 – The elements
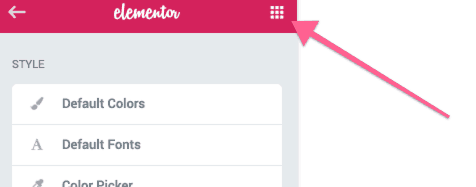
You can always click that little square(s) icon to pull back up the elements, which you can drag-n-drop in your page.
3 – Page settings

We’ll be going through how to navigate page, section, column, and elements settings down below.
However, the page settings button is where you can edit the style of the entire page, and also update your page/post title, featured image, and page layout (see below).
You can also utilize the page title and featured image settings from the main WordPress dashboard as well!
Important: Choose your page layout!
If you are building full pages or posts–i.e. not individual widget templates–this is a crucial step!
If you want full-width landing pages, etc, you’ll need to choose either Elementor Canvas or Elementor Full-width.
If you’re just adding elements into an existing blog post, or just need to put stuff in the normal “content area,” just use the default.
See the image below for more!

Note: Choosing your page layout ONLY applies to full pages and posts–it doesn’t matter when building widgets, even though the settings will still appear.
Outside of setting up your page layout, the only vital information you need now is how to navigate settings and style your elements!
Woot!
How to style sections, columns, and individual elements
If there is ANYTHING that tends to frustrate bloggers using Elementor, it’s NOT how to style individual elements.
Colors and fonts are easy…
Margins, padding, full-width elements, inner sections–these can be frustrating. Mastering these is crucial, and most people skip this.
We’re going to dive into each of these in turn, after we figure out where to click to even access stuff!
Important: Where do I CLICK to access settings & styling in Elementor?
This is a bit tricky for beginners.
Hover over the area you want to edit, and you’ll see the related “boxes” pop up.
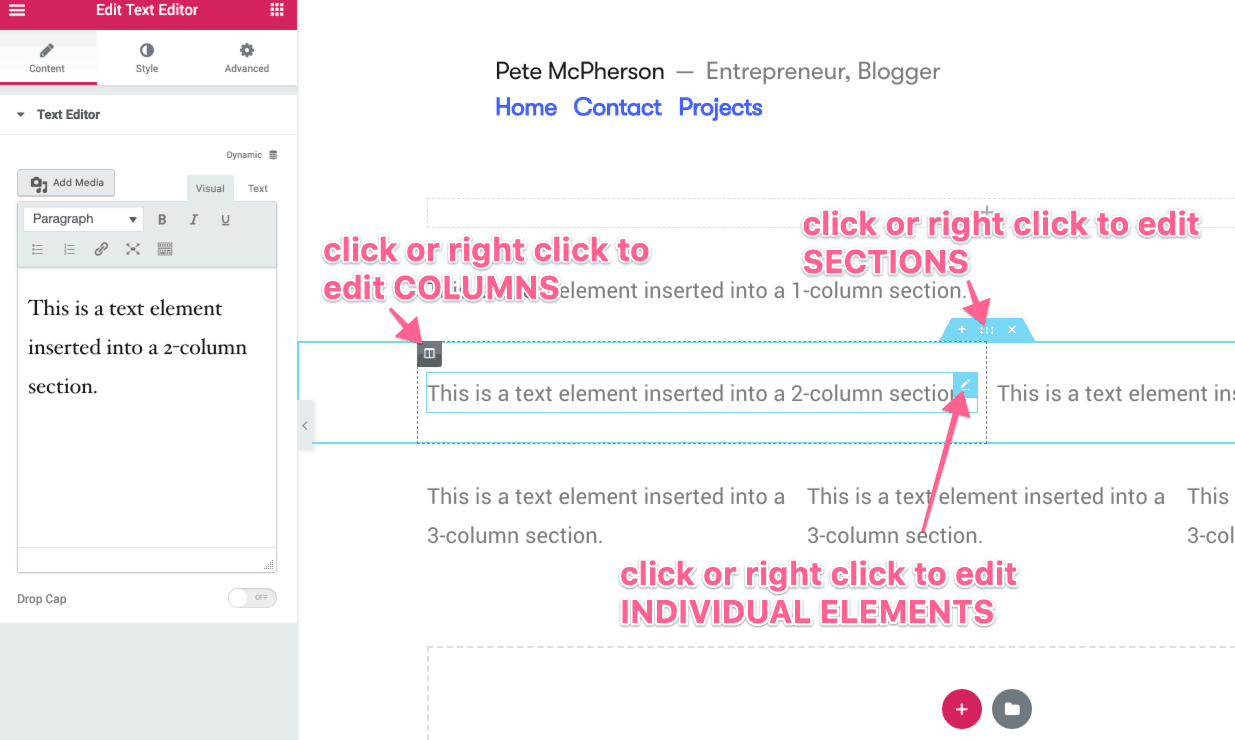
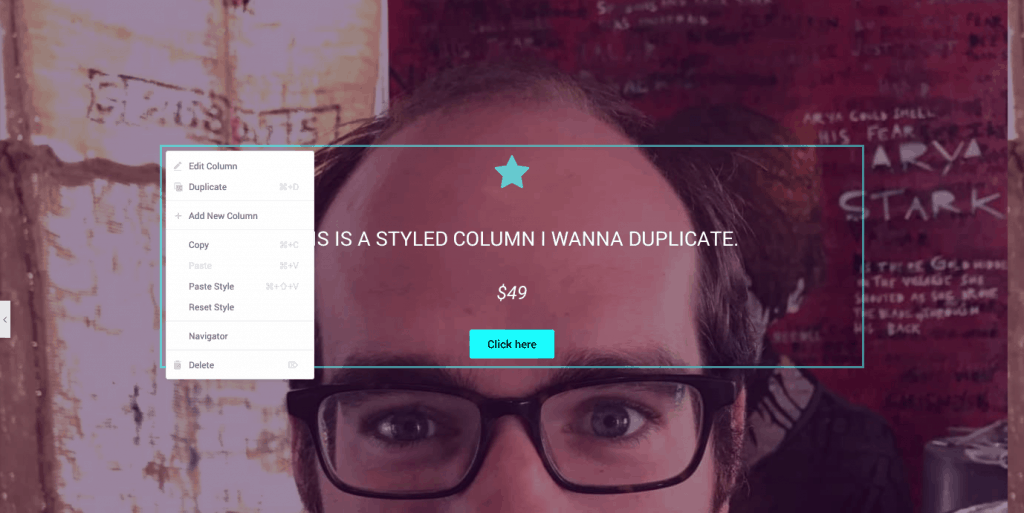
Right-clicking will bring up the basic settings that are available for every element, column, and section: duplicate, delete, copy, paste style.
Left-clicking will pull up the content, style, and advanced settings editor on the left side of the page.
It takes a second to get used to.
Understanding & styling Elementor “sections”
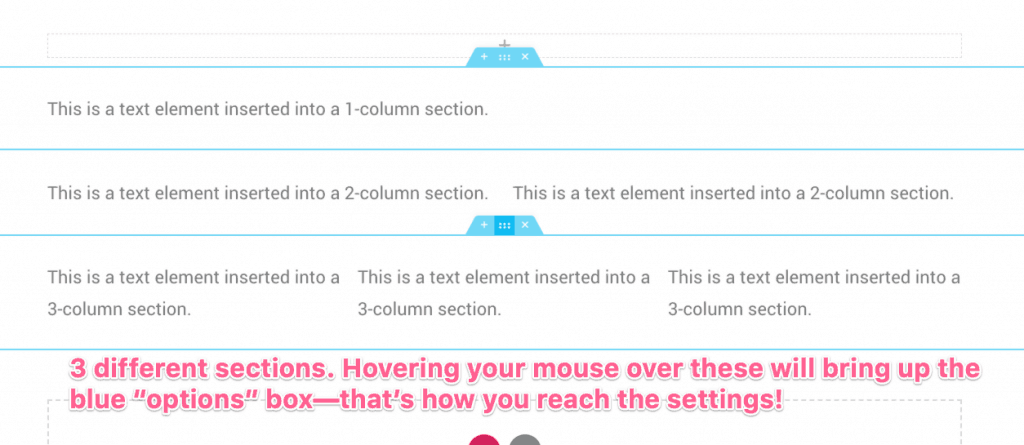
The largest “container” for elements–other than the page itself–are called “sections.”
When you open a new Elementor page, you’ll be presented with a pretty little button to insert a new section, and you’ll have the option to add columns at that time.
You can easily add/delete columns later.
Here’s how to make sections stretch to the edge of the page, and take up more space vertically:
Remember that these settings are accessed by hovering over a section and clicking the top blue box thingy.
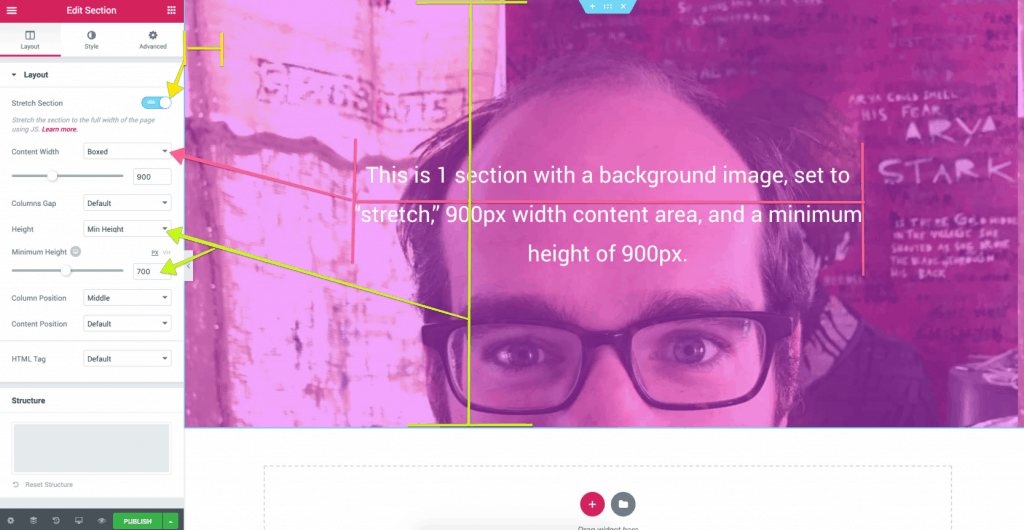
Note: the minimum height in the image above is 700, not 900.
Content Width:
This is an important one as well. If you leave as “boxed,” you can use the slider to make the content more narrow, wider, etc, or you can set it to full-width
Column Position:
If you have tall or “fit-to-page” sections–like above–you can choose whether or vertically center your columns, or put them at the top or bottom.
Understanding & styling Elementor “columns”
First, note that you can right-click any column “box” after hovering over it, and either add a new column, or duplicate the current column.
This is handy if you’ve already styled a column to your desires!
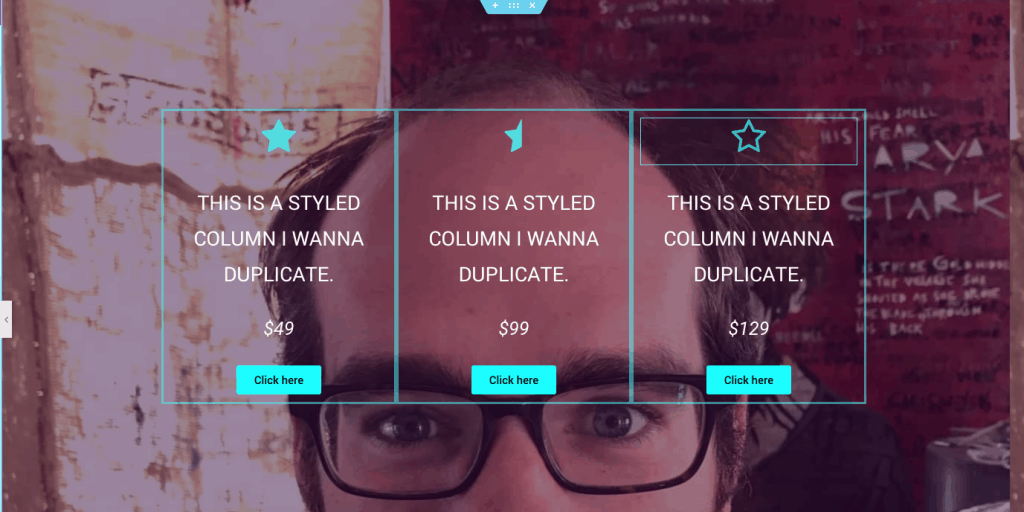
The only 2 things you really need to know about columns specifically, is how to change the column widths, and that you can also choose whether to center content vertically, or push it to the top or bottom!

Understanding & styling Elementor “elements”
Simply clicking on any individual element, or hovering over it and clicking it’s “box,” will bring up the element settings.
Note: the settings available for each element will be different based on the type of element!
How to move elements, columns, and sections
There are 2 ways!
1 – Drag and drop
You’ll want to hover over the element/section you want to move, click the “box,” and drag to where you want it to go.

2 – Use the navigator.
You can access the navigator via the bottom-left menu icon, or by pressing “Command-I” or “Control-I.”
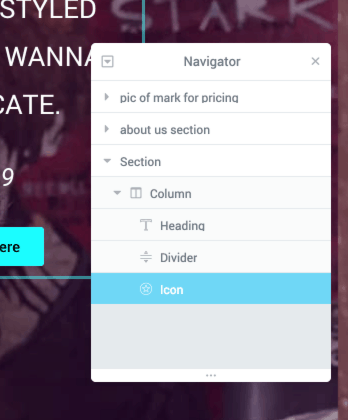
You can use this to drag different sections or elements around, rename sections, and more.
Now let’s walk through just a few style settings:
Elementor styling options.
Note: not ALL of these are available for every widget/element! Some are for sections only, or specific elements like forms, etc.
Background:
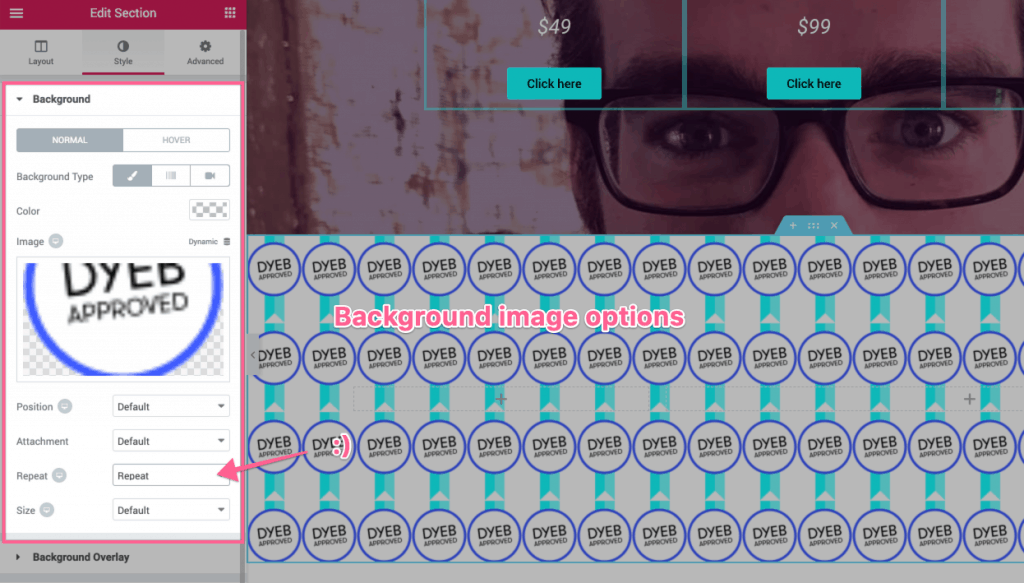
You can choose a background image for sections, columns, etc. It could be images or colors, and you can also choose color overlays for images, etc!
Border:
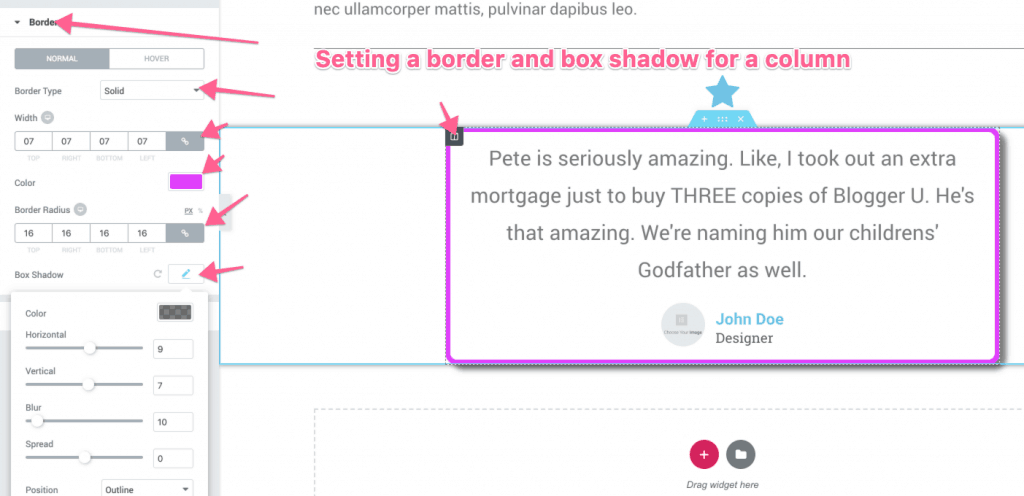
Borders are available for every element, section, column, etc, and you can easily change the color, width, and roundness of edges.
Typography:
This is exactly what it sounds like. You’ll come here to edit font family, font size, line height, font weight, etc.
Did you know you can easily use custom fonts in Elementor?
- In your WordPress dashboard, navigate to Elementor -> custom fonts.
- Add a new one
- Upload the different font files (.woff, .woff2, .etf, etc)
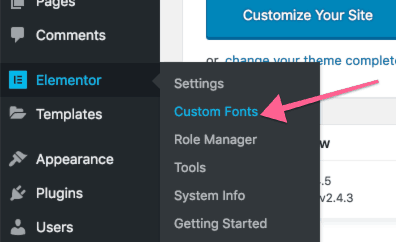
Your custom fonts are now available in Elementor editors 🙂
Margin & Padding:
Warning: this is for advanced bloggers only.
There are several HTML & CSS related attributes you can edit for each section, column, etc., under the “advanced” tab.
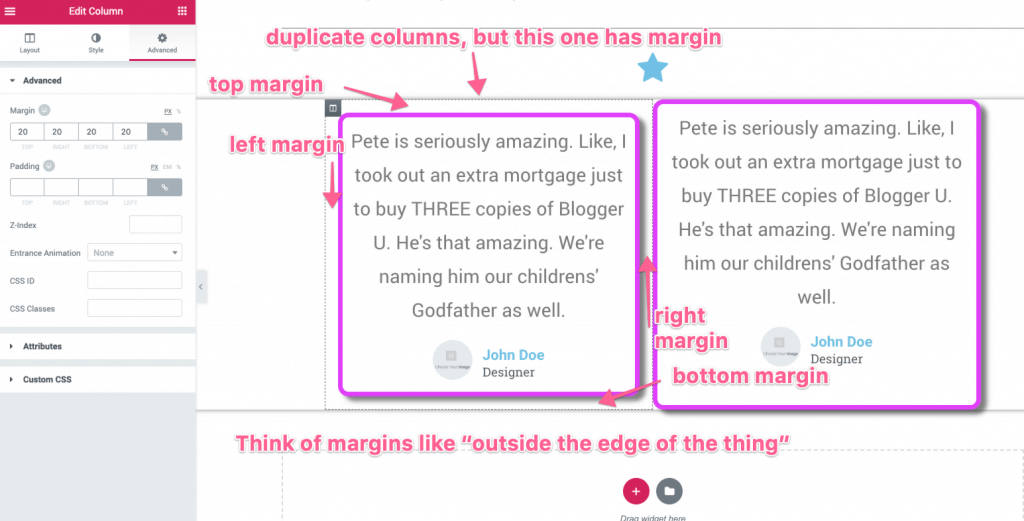
If margins can be thought of “the space just outside our thing,” padding is the space “just inside our thing.”

I’d use caution here if you’re not comfortable, as you’ll definitely need to circle back and change these for different device sizes (see below!).
However, it can create some cool designs, or be helpful to get the exact look you’re seeking.
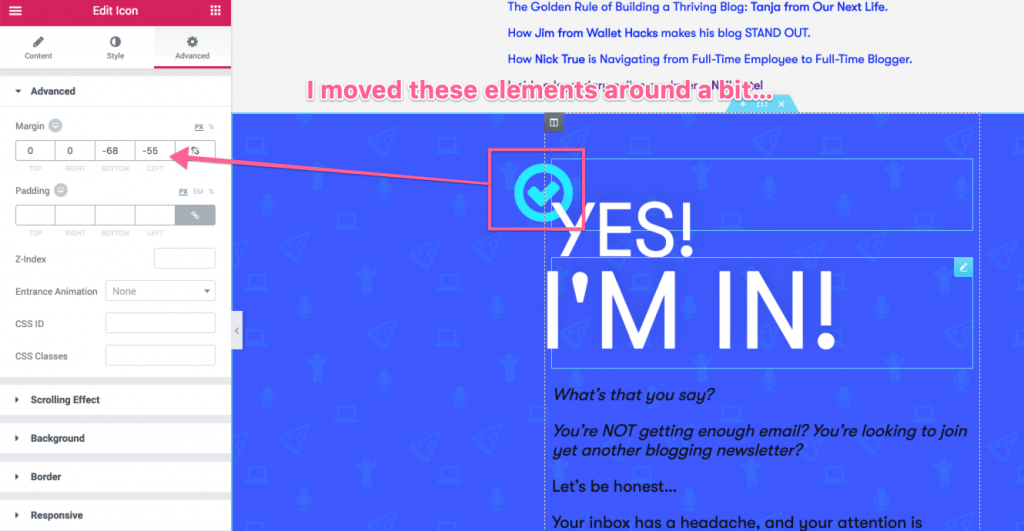
Here’s an example from a landing page I built a while back.
Neato ????
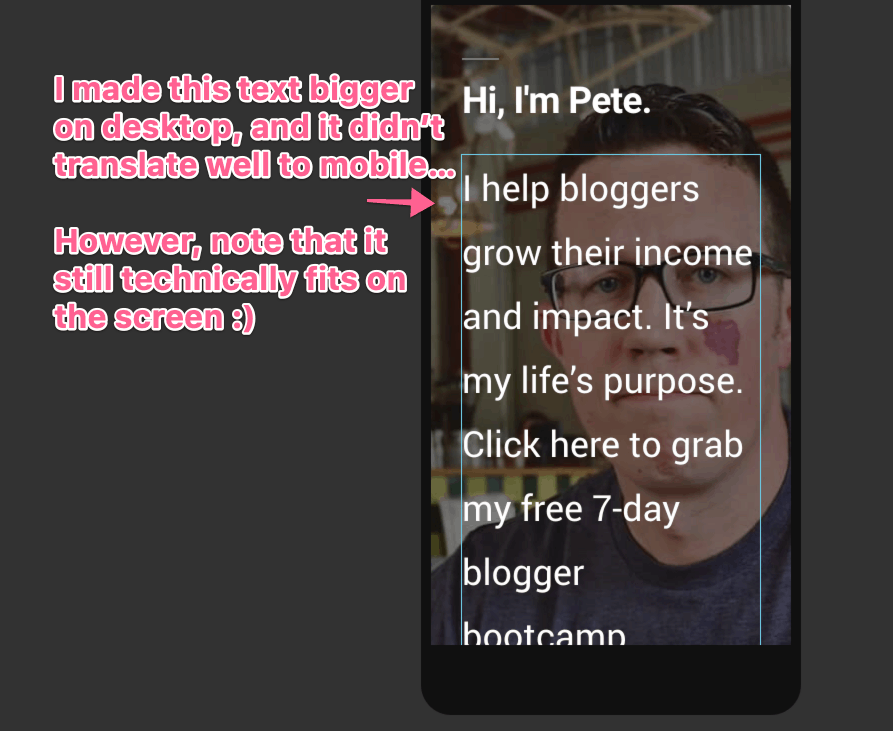
Elementor Mobile Responsiveness: How to style for phones and tablets
Good news & bad news.
Good = MUCH of the built-in elements and styling in Elementor will end up being quite mobile-friendly!
Bad = Once you start messing with custom font sizes, formatting, etc, you’ll definitely have to do some tweaking to keep it mobile-friendly.
First, previewing your Elementor pages for phones and tablets is simple–click the “responsive mode” button and choose which to preview.
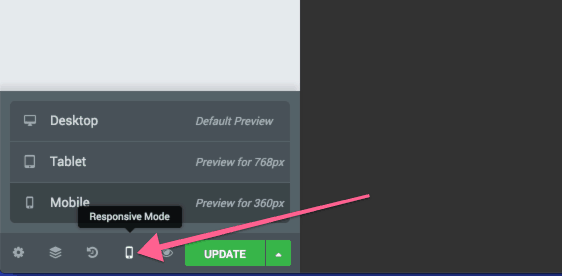
Ready to be amazed?
While you are previewing for mobile/tablet, the Elementor settings automatically switched so that you’re now editing just for that screen size!
You can always tell which screen size you’re editing with these 3 icons:
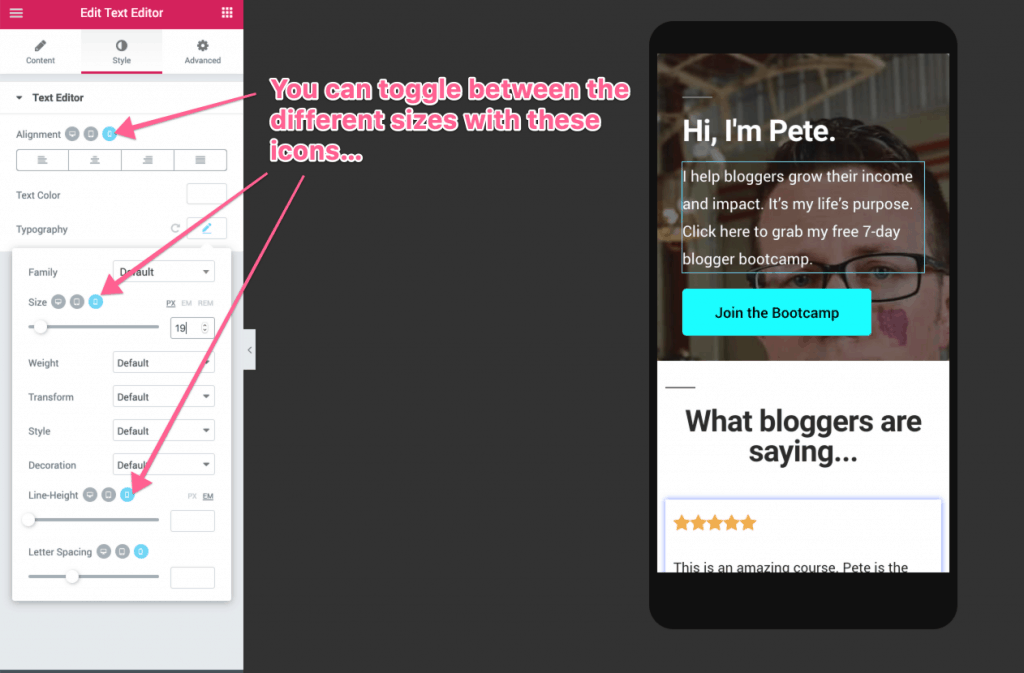
Important Note: Not ALL settings can be customized based on screen size. This is intentional and is likely stuff you shouldn’t be changing anyways 😉
Here’s my workflow for making sure all my Elementor drag-n-drop pages work on all screens:
For any sections or elements that will NOT be repeated:
- Design and get to 100% on desktop
- Switch to mobile preview, and editing for mobile from top to bottom
Exception: Any sections or elements that WILL be repeated:
- Design that element on desktop
- Switch to mobile and make responsive
- Go back to desktop and continue as normal
For sections, columns, or elements that are repeated, it’s quicker to get the first to 100% on desktop AND mobile.
One more thing on this note…
Pro Tip: Check the *column* margins on mobile
I’ve seen this issue a lot:
I’ll have a perfect element on desktop, but it somehow gets pushed to the edge of the screen on mobile.
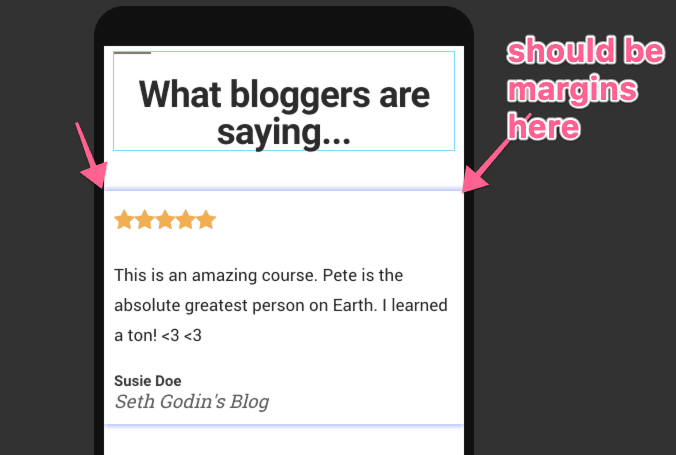
If you clicked to edit the margins on that *section,* you’d see you can’t edit it.
What you CAN do is edit the *column* margins.
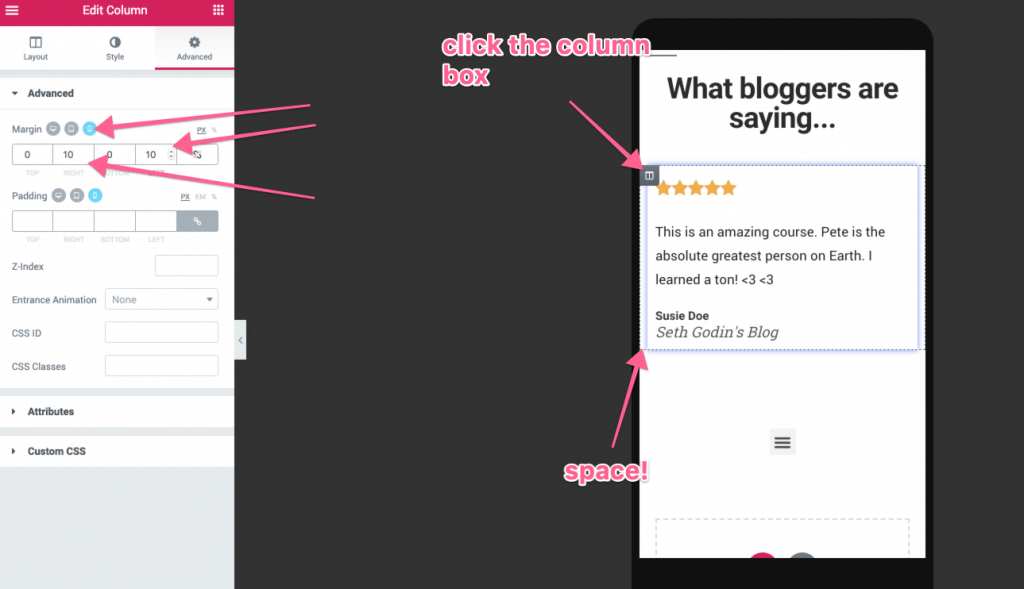
Handy!
A walk-through of advanced Elementor features
Luckily, these aren’t really “advanced” because they’re harder to create per se–they simply accomplish more advanced functions outside of drag-n-drop page building!
Global Widgets 101
What if you wanted to have an opt-in form for your newsletter you could use repeatedly in blog posts, in your sidebar, and in your footer…
…and what if you could edit every instance of that form at the same time?
That’s a global widget.
- Opt-in forms
- Author
bios - Social follow icons
- Social share icons
- Affiliate item “promotion boxes” you mention often
These work really well as global widgets.
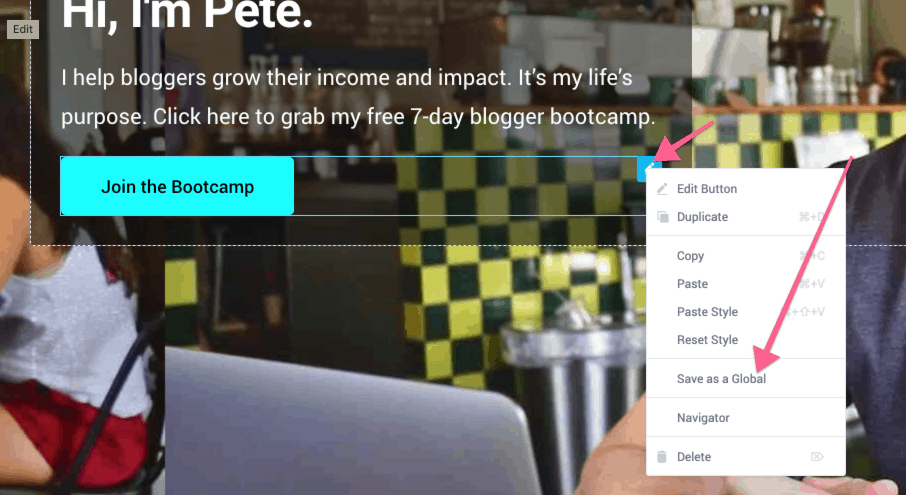
How to create a global widget
It’s simple.
- Right-click any individual element
- Click “save as a global”
No need to create a template from scratch either. If you’ve already created a form somewhere on an Elementor page–head there and save it as a global widget.
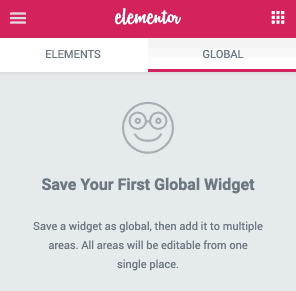
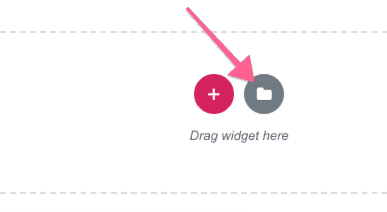
You can insert global widgets from here:

Wanna edit your global widget? You can edit it from any instance of it in an Elementor editor.
You can also insert global widgets, and then un-link them, allowing you to customize that individual widget and not affect the rest of the instances across your site.
How to use pre-made templates (and save your own)
There are 2 types of templates:
- Page templates
- Section templates
This is important, as you save the two different types of templates in different ways!
Inserting page templates
To use a full page template, you can click the template button in any Elementor page–just be sure to edit the page layout after you insert it.
You can then preview the templates, and click the “insert” button.
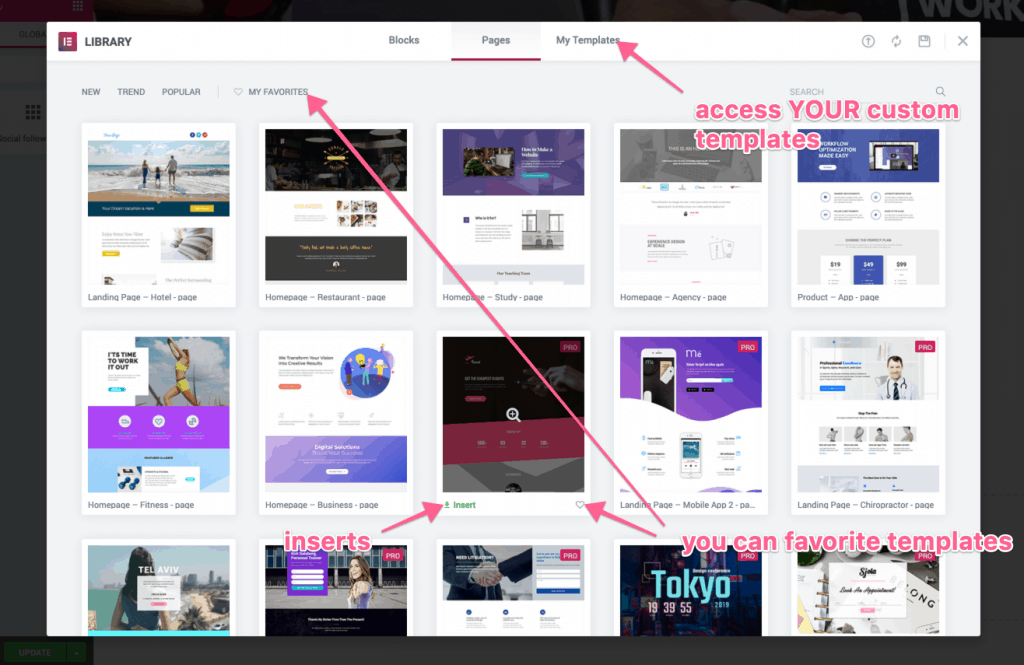
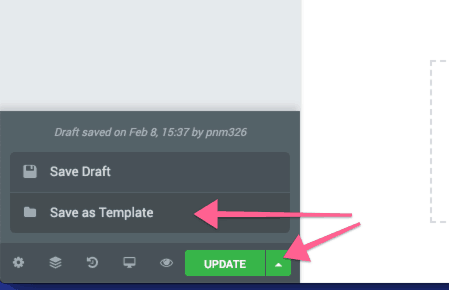
Saving your own page templates
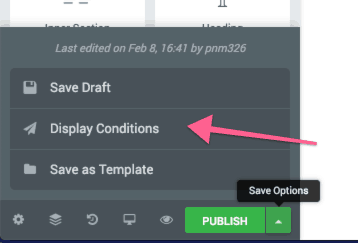
If you want to save an entire PAGE as a template, that button can be found on the bottom-left menu, in the “publish drop-down” box.
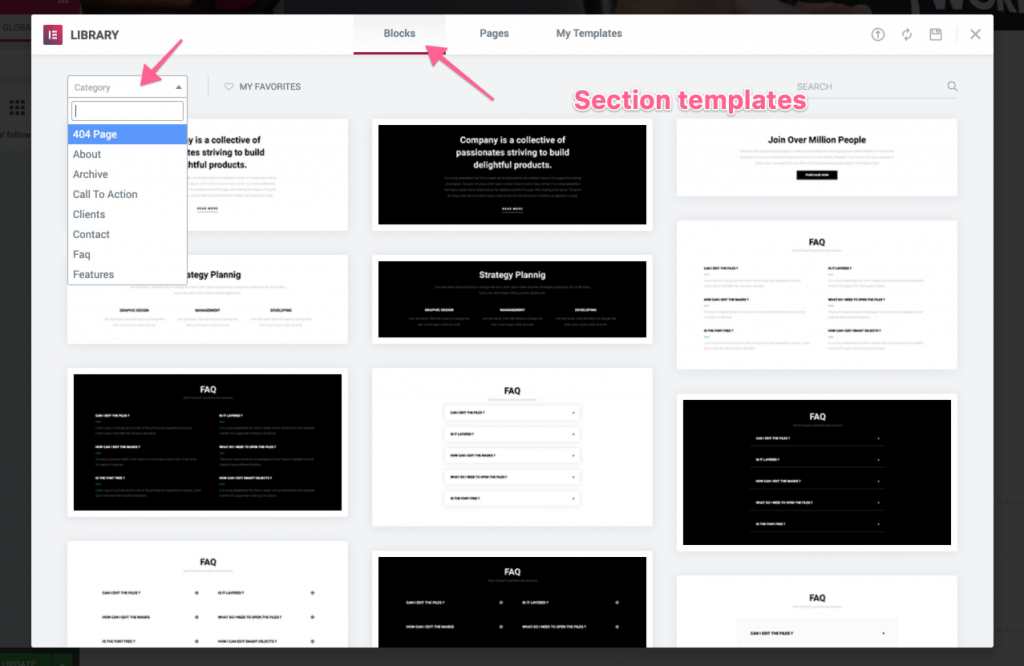
Inserting section templates
You can also insert–and save your own–individual section templates!
Note: Elementor calls these “blocks” in the template dashboard, which I find a tad confusing.
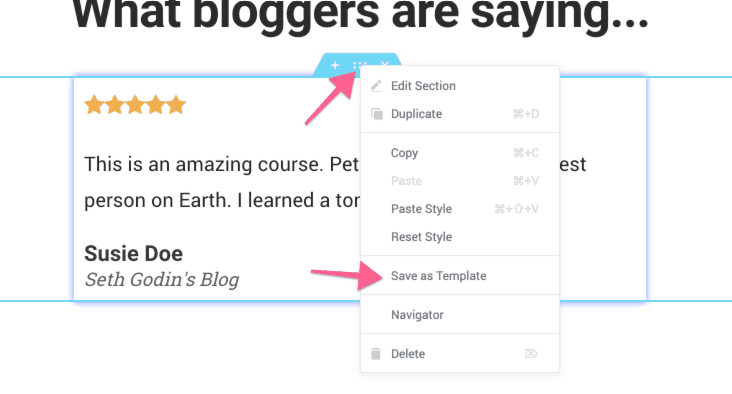
Saving your own page templates
You can do this for any section you create, anywhere.
Simply right-click and save as a template.
Accessing, importing, and exporting your templates
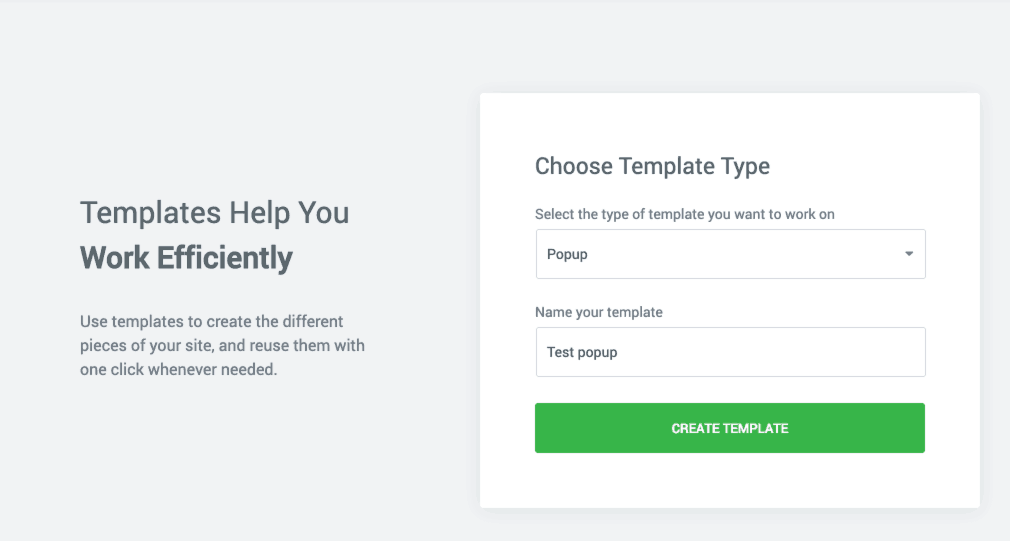
You can find all your page templates, section templates, and theme builder templates (headers, footers, custom post templates, etc) from your WordPress dashboard:
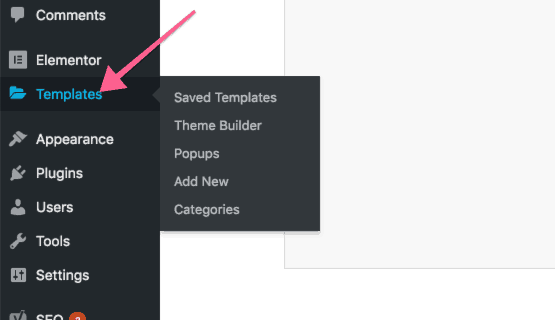
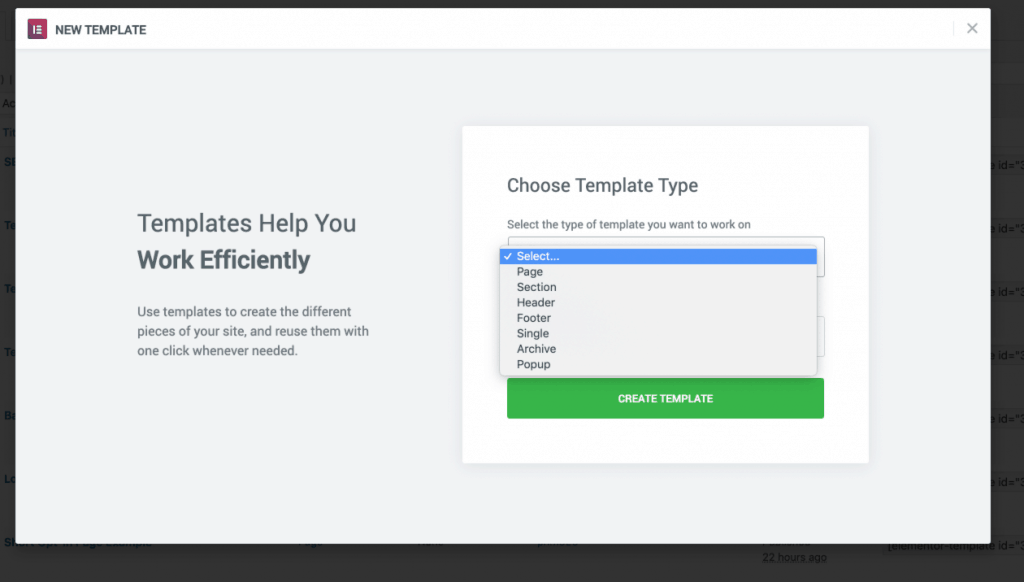
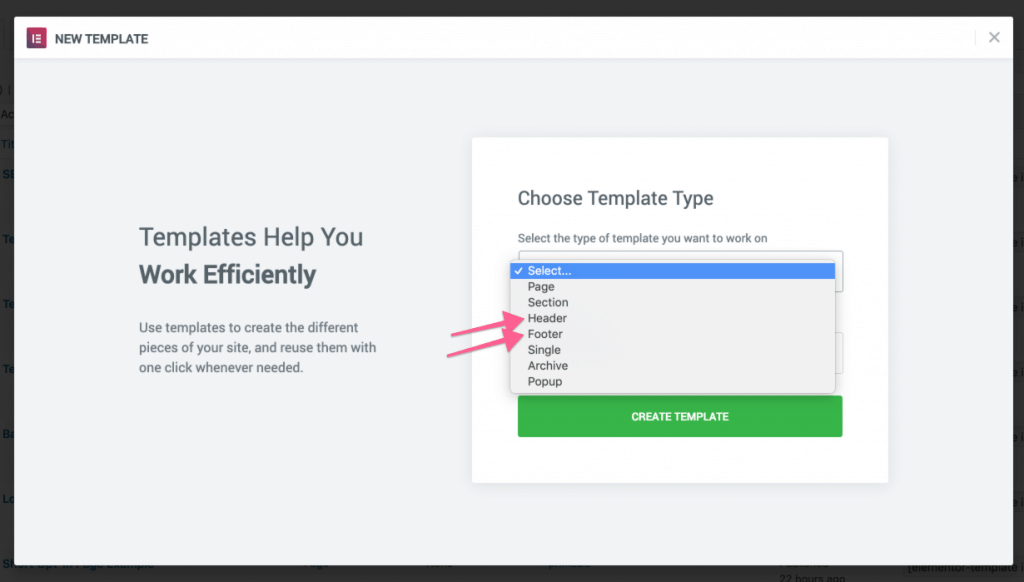
Note that you can also click “add new” here to create a template.
You’ll be prompted to choose the type of template, name it, then the Elementor editor will open up.
Important: When you’re creating and editing an individual section, header, footer, or post template–you will see your theme’s site header and footer! I’m not sure why Elementor doesn’t hide it, because you’re still just editing the individual element.
Got that?
Inner sections: How to add “rows” in Elementor within sections
What if you wanted to have 1 section with multiple rows?
I.e. maybe you want the top row to have 1 column, but a 2nd row to have 2 columns.
The “inner section” element accomplishes this.
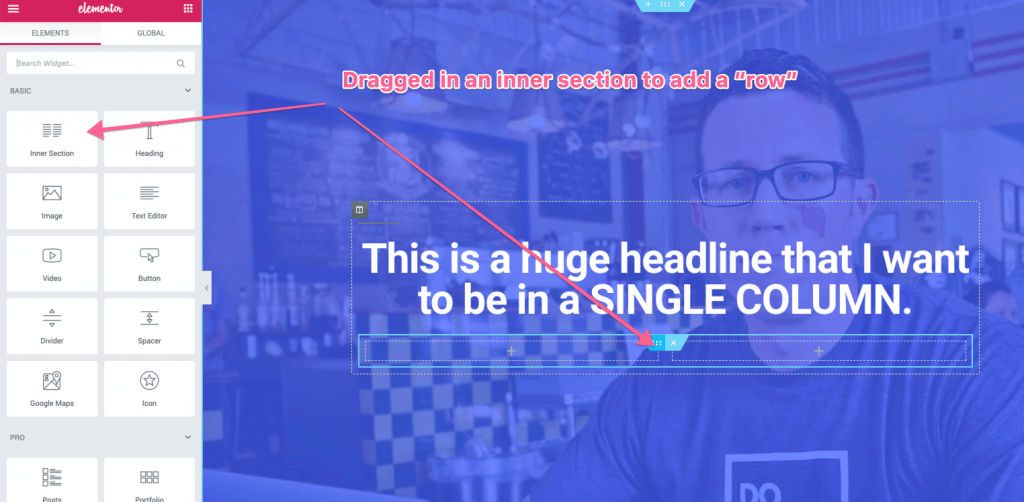
This is a handy tool–and you’ll discover you can edit the inner section settings exactly like that of a bigger section.
How to Build Your Own Theme Elements using Theme Builder
Yeah yeah, you can totally create drag-n-drop headers and footers using Elementor–but that’s not the best news.
The power here is that you can specify which pages your custom headers/footers appear on around your website! It’s called conditions in Elementor, and it’s available for headers, footers, custom archive pages, and post/page templates.
How cool is that?
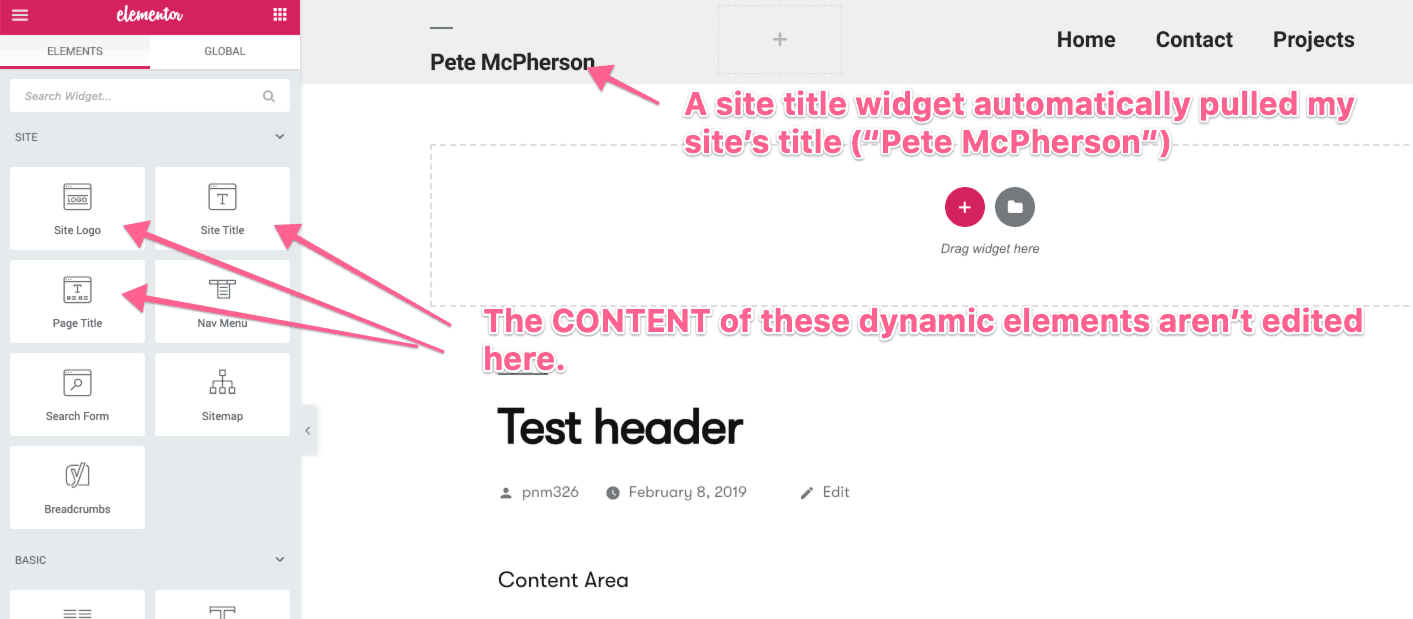
What is “dynamic content” in Elementor?
Dynamic simply means “this element updatesitss content based on changing data.”
I.e. You don’t specify the content specifically. Elementor pulls the content from elsewhere depending on the element.
A few more examples of dynamic elements:
- Post title = pulls in the title of the post
- Featured image
- Post content = pulls in the content you write in the normal WordPress editor
- Post comments = pulls in the comments area for that page/post
It’s this dynamic content that allows you to use Elementor to create custom blog post templates 🙂
Are you starting to see why Elementor is by far my favorite plugin? It’s powerful.
Creating your own custom headers or footers
Oh look, I have a short and sweet YouTube video that walks you through this process 🙂
Simply click “add new” under “templates” in your dashboard, then select “header” or “footer” when prompted to choose a type.
You’ll then be prompted to choose a pre-made template–but you can also just “X out” of that screen and build one from scratch.
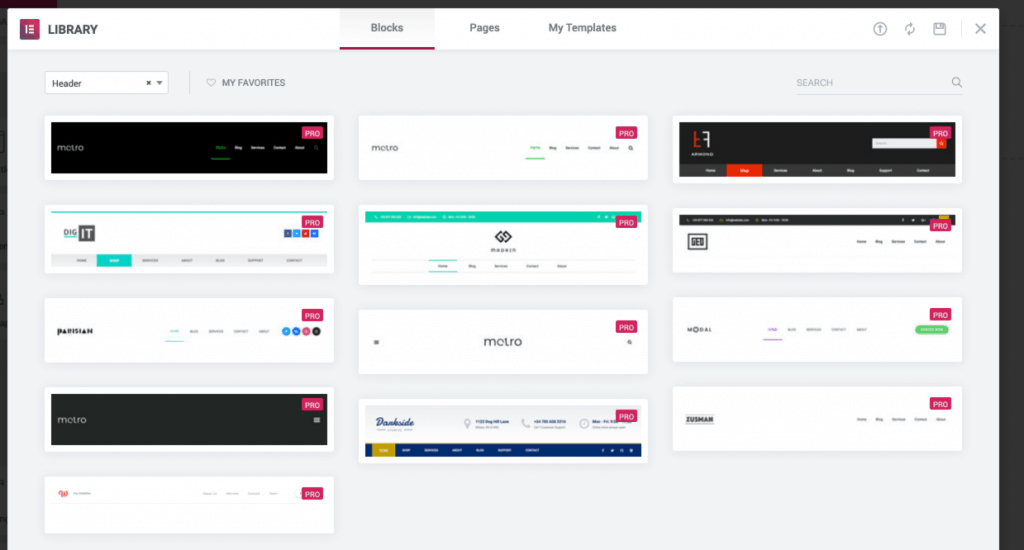
If going from scratch, make sure to use dynamic content!
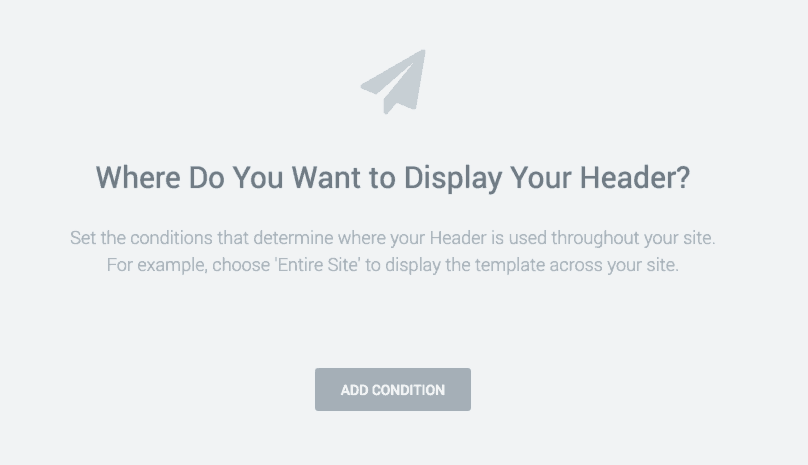
Display conditions: Choosing where to display your custom theme builder elements
Whenever you go to publish a custom header, footer, or post template, you’ll be prompted with this screen:
FYI, you can also access display conditions from the bottom menu:
So on what pages do you actually want to USE your custom header, etc?
- Included on every page?
- Included on every page, excluded on your front page?
- Only on blog posts with a certain category or tag?
- etc
How powerful!
Introducing the “Hello” WordPress theme from Elementor
Yes, you can use Elementor with ANY theme.
Yes, you can even build your own custom theme elements (like headers, footers, specific blog post templates for specific categories, etc), with ANY theme.
However, if you want to use Elementor to custom design your entire website–they build a WordPress theme just for that! It’s called “Hello.”
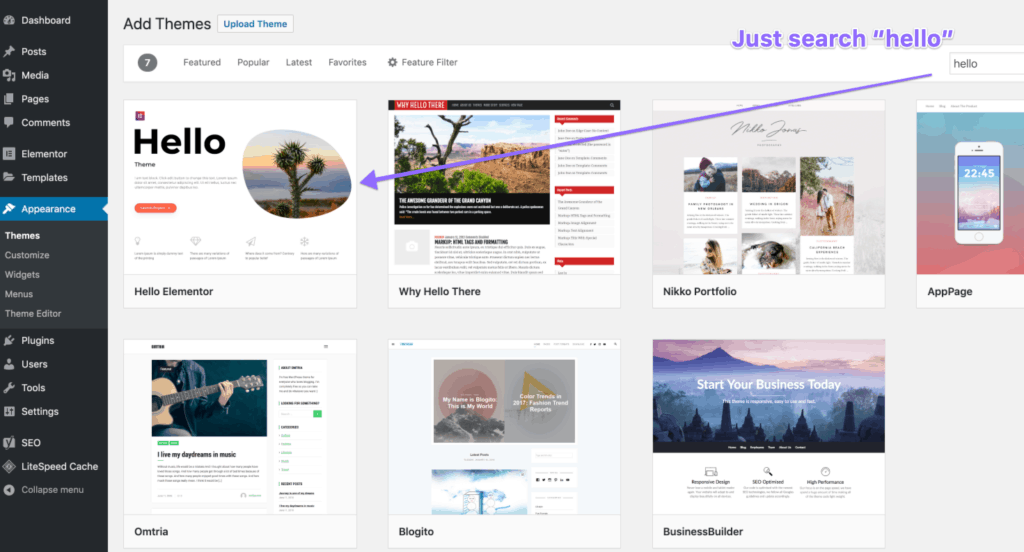
What’s so special about the Hello Elementor theme?
Not much.
As in, literally not much. It’s a bare-bones lightweight theme!
The theme was built to be specifically used with Theme Builder, so it contains absolutely no features and minimal styling.
This helps reduce plugin conflicts (that could cause Elementor or other plugins to break), and reduces your theme’s load times!
The website you’re looking at right this second uses the Hello theme!
How to create Elementor popups
Luckily, these are edited the exact same way as everything else in Elementor.
There are only 2 things different about designing popups:
- Custom layout settings
- Display conditions and triggers
You’ll notice that popups have a slightly different layout settings pane:
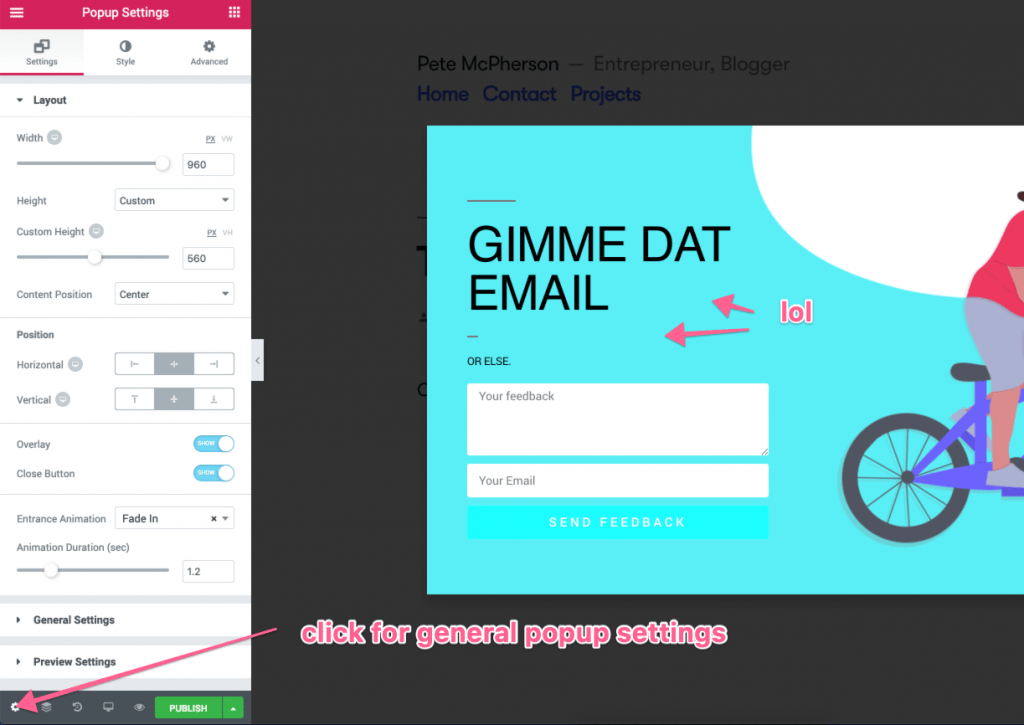
Everything’s pretty self-explanatory.
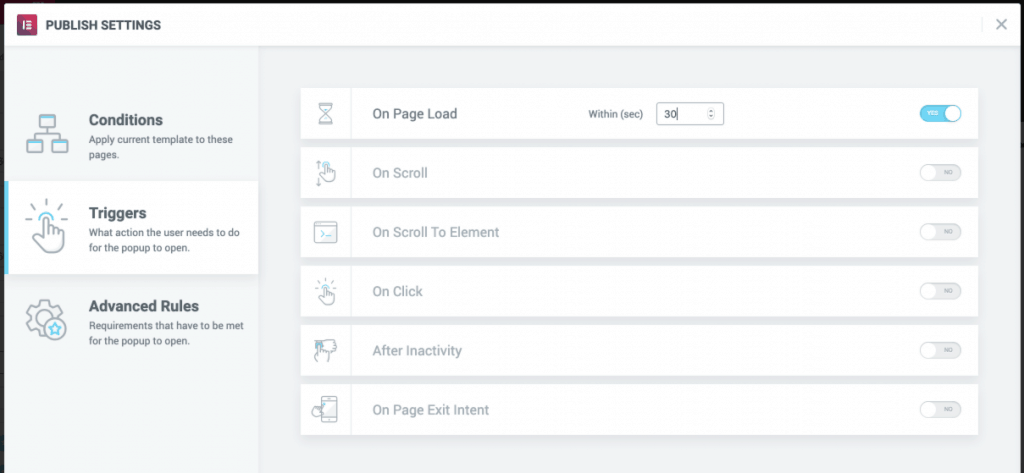
Elementor popup display conditions and triggers
When you go to publish a popup, you’ll be presenting with these advanced settings (these are also accessible in the “publish drop-down” box as well.)
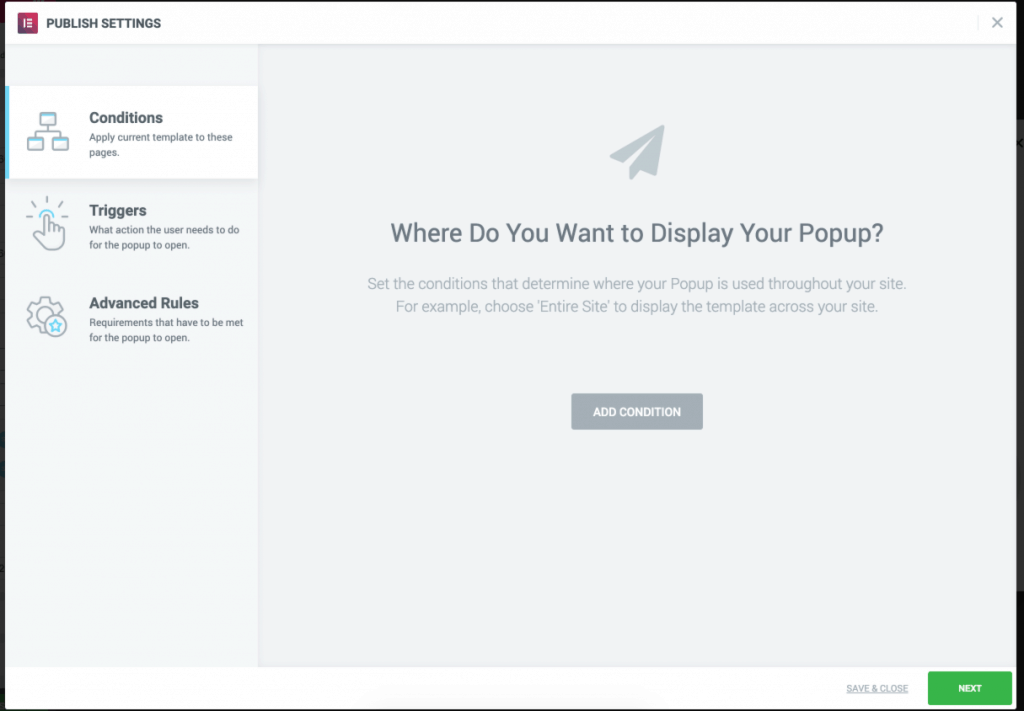
- Conditions – Which pages should the popup be put on?
- Triggers – On what action–or when–should a popup actually popup?
- Advanced rules – how many times should we show the popup, and to whom?
You can choose to have popups triggered on
- exit intent
- after a certain amount of seconds
- a certain percentage of
page scroll down - when people click something
Sweet.
How do I trigger an Elementor popup on a button or link click?
I personally don’t use exit-intent popups on Do You Even Blog, but I DO love having the functionality of triggering one on a click!
Here’s what you do:
- Create a popup first, but no need to set any display rules or triggers.
- Optional: If you have a form on your popup, you can add a “close popup” action in the “actions after submit” box.
- When setting a button’s link–choose the “dynamic” option
- Choose “popup” under “actions”
- Click “popup” to bring up the selection screen, and choose the popup
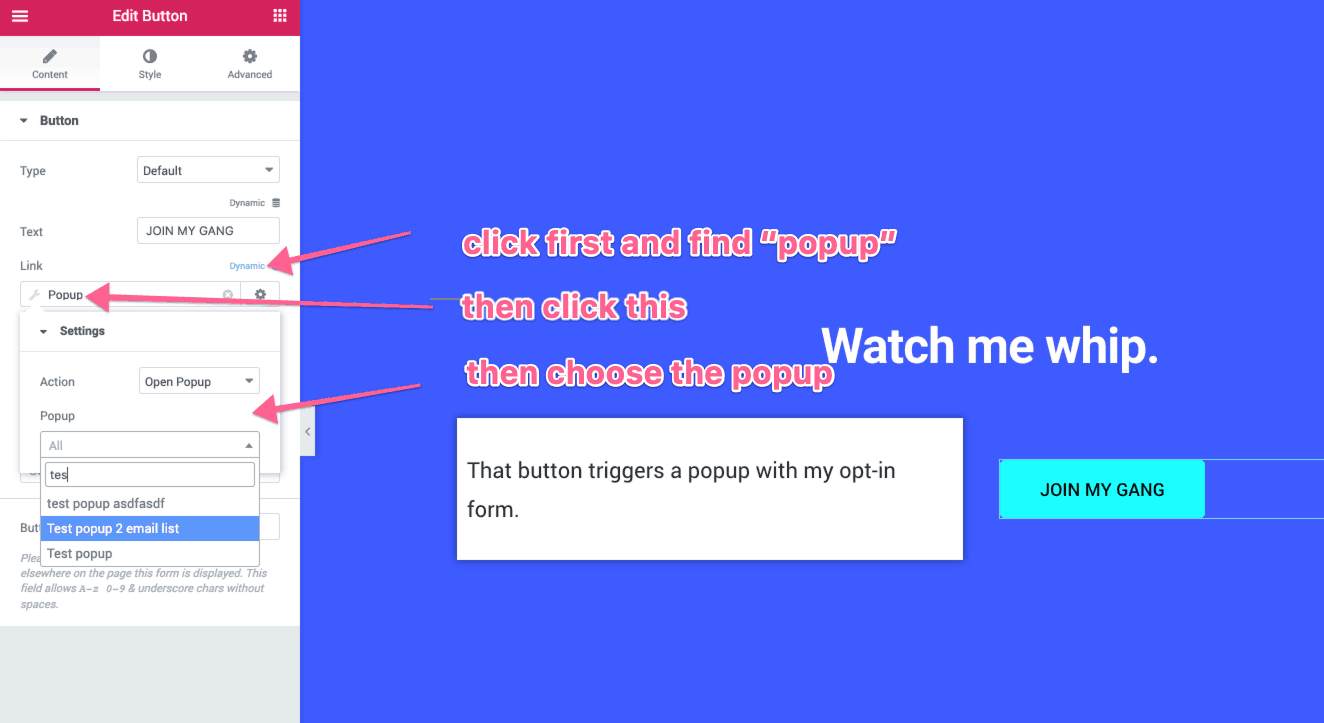
woooo! I love this functionality.
Introducing Elementor for Bloggers: A start-to-finish video course (with pre-made templates!)
Ready to be an Elementor Pro master?
This 4-hour course will have you designing and implementing everything Elementor has to offer–in an afternoon.
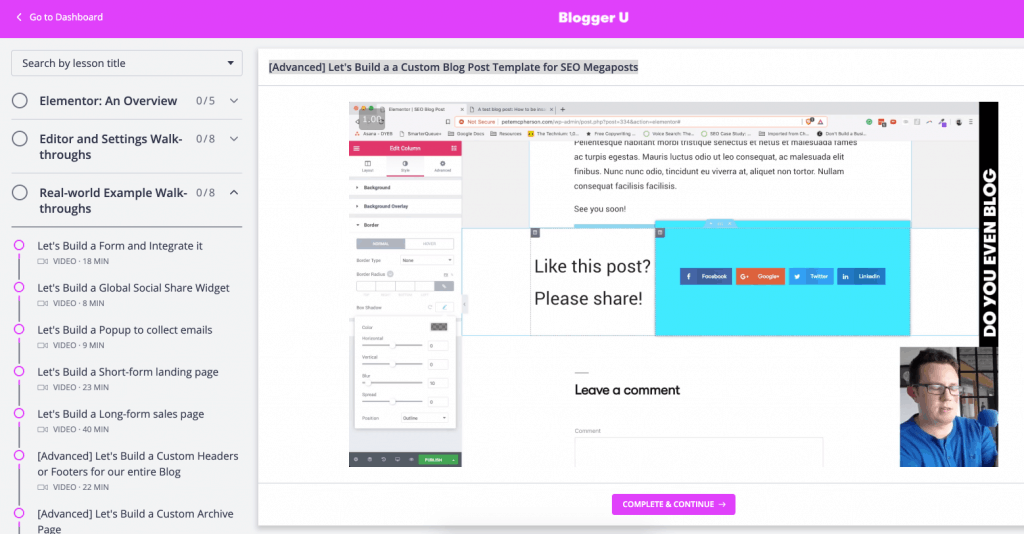
- 3 Modules
- 21 HD Videos
- Example walk-throughs for real-world blogging examples!
- Pre-made templates you can import and 3run with
Woot!